
Showing posts with label resin casting. Show all posts

Monday, September 1, 2008

Fruit Magnets in the House.

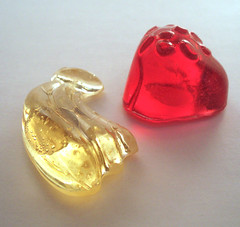
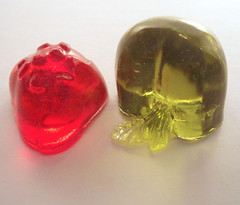
Fruit magnets have finally made it to the shop. Essentially, there are two varieties: frosted and glossy. I'm going to tell you about them.


Frosted: The silicone molds I'm using naturally create a frosted finish. It really does look nice; light passing through is diffuse and casts a colorful glow-y shadow.

Glossy: Have a coat of high-gloss glaze on them. Once the glaze is applied and dries, the piece becomes incredibly glossy. It's almost petulant for (fake) fruit to behave so brazenly!

The ultra-powerful magnets are attached via "Goop" craft adhesive. It is a wonderful clear adhesive, but in the right circumstances (when 2 magnets meet at just the right angle and force), the magnets can overpower the adhesive and pop right off. So, I put a word of caution in the magnet listing about this VERY naughty behavior on the behalf of the neo magnets.

These are really fun to make, but from beginning-to-end, it is a laborious and time-intensive process:

1) Condition the molds
2)Warm the resin & catalyst
3)Pour/mix the resin, adding color if desired
4)Pour resin into molds
5) Babysit the molds as long as you can stand it (getting rid of bubbles, placing embeddments, etc.)
6) Wait a couple of hours and pour another layer (if adding embeddments)
7) Repeat # 6
8) Let resin cure overnight, in a covered container to prevent dust and wot-not from getting in
9) Pop pieces out (VERY hard on the hand joints), but extremely satisfying
10)Use dremmel to sand the backs until smooth (uses 2-3 different dremmel bits, goggles, dust mask, enormous mess)
11) If making a pendant, drill hole
12) Treat hole with sealant
13) Add gloss finish if that effect is desired
14) If piece is acceptable, attach findings for jewelry or magnets for, well, magnets
15)If piece is not acceptable, mix a new batch of clear resin and brush on the surface of piece
16) Check again for acceptability in 24 hours
17) Resand pieces if needed (or give the unsatisfactory ones away to unsuspecting family members)
18) Take photos
19) Make super-cute "upcycled" tin containers for presentation
20) List them in the shop!

It really is fun.

Saturday, July 19, 2008

Waiting.

Ah, waiting. It's so hard! I'm waiting for my first etsy sale. And the self-doubt begins to creep in. So I'm occupying myself with projects.

First, I completed a little set of "enclosures" for the future-my-favorite-people-in-the-world who decide to buy a handmade bag. I have to admit that they are really cute. So cute that I had to take several pictures of them.


This is a jumbled bunch of glittery resin pendants from my 2nd round of resin casting. I'll post a more dignified picture of the good ones tomorrow.


Also, the afternoon sun has been cooking me in my little attic/loft/studio, so I put up a little curtain made of 6 stitched together vintage hankies. Much better.


Now, to begin my next set of bags: the "Michele" line. Cute little totes with a vinyl outside and polka dot inside. VINYL. The iron-on kind and I am itching to get started. Meanwhile, these little bags huddle together in an air-tight container, awaiting their new home. *Sigh!*


Tune in on Monday for: "Why does MM have a want ad on Craigslist for old board games?" AND a peek at the loot to be gained from Goodwill Blue Hanger. Oh yes, AND the results of my first attempt at an "altered art collage" or whatever they call it. xxxooomm

Monday, July 14, 2008

Weekend Adventures

Hello Reader. Have I thanked you recently for visiting my little blog?

If I could summarize the weekend in one word, it would be "resin." However, a few other activities were squeezed in.

First, I finally made a batch of bottlecap magnets using UTEE (Ultra Thick Embossing Enamel). I had a 40% off coupon at Michaels, so I sprung for the melting pot thing-y and it is super easy to use. The results:


Also, H. and I did a little thrift shopping in Salado, and found a few neat things between a garage sale and a new antiquey-book store. I am especially excited about the game boards. I have big plans for those babies. also I found a neat link on how to clean game boards. Check out that fortune-telling book. YES. I've already started slicing it up.


Last night, I poured a first layer of resin in my 3 molds (that took about 2 hours to clean out from the first attempt disaster). They look great this morning. I used the resin stuff that comes in a can and it is most toxic. Stick with Easy Craft. We were high all night, but not in a good way. For batch #2, I have some very cute transparency images and paper to layer in. Egggs-cellent! (twiddling fingers like Mr. Burns).